Understanding CSS and Why You Should Learn it
When creating a website or blog, it’s important to have a basic understanding of CSS, what it does, and how it works. People often come to me asking how they can adjust their themes and their templates to make things look and feel the way they wish them to on a website or within WordPress.
What this post aims to cover.
Here are a few of the things we will cover in this post:
- Creating a Basic understanding of CSS and what it does.
- Editing CSS in WordPress Customizer.
- Example CSS code.
- Creating a Basic understanding of HTML and how to use it.
- Resources for learning.
So what is CSS?
CSS is short for “Cascading Style Sheets” and it’s a system that is used alongside HTML. CSS is used to define how and where your content should be displayed and how it looks/renders on a device or screen.
What can CSS do?
Learning and understanding CSS will allow you to position items anywhere on a page, determine the size of items, the colour, the shape, the style, set background images or gradients, apply animations, make your page react to the available screen space (so it looks different on mobile to desktop, etc) and so much more, the possibilities are endless!
- Want links that change colour on hovering over them?
- Images that grow slightly as you hover over the thumbnails?
- Elements which expand upon click to display more information?
- A fade-in or fade-out effect for aspects of your site?
- Visual effects when you hover over posts? (see my blog section for an example of this)
- Content that appears and changes as you scroll down a page?
All of the above is possible and can be done via CSS!
You can control aspects of every page on your site or individually with just a few lines of code.
CSS allows you to change the way your site looks and feels without altering your contents HTML. Additionally, thanks to the way WordPress allows for “Additional CSS” it’s easy to add CSS rules without modifying any of the original themes or templates, this means that your customizations will apply even after an update is applied to your theme.
Why should you learn CSS?
There are many reasons to learn CSS, learning CSS will give you complete control over your content style, how it displays on different devices, where the content is positioned, as well as the overall look and feel of your content when being viewed, good use of CSS translates to eye-catching content. Nobody likes dull boring content.
Basic CSS can be picked up fairly quickly, it doesn’t take long to learn the basics and you’ll soon have a grasp of how to stylize and position your content to suit the message of your content. If you truly want 100% control over your content and don’t want to have to pay somebody else to do it for you, you may find it worthwhile to learn some of the more advanced aspects of CSS.
What about plugins?
Many plugins claim to give you the tools and features necessary to customize your sites such as:
These plugins while free for basic use, often require premium subscriptions to unlock the more desirable features. While plugins are designed to help those who prefer not to alter code by offering a more visual editor, they vary in their approaches and may not always provide you with the look and feel you are after.
Where to add CSS in WordPress
While you can add CSS directly to your WordPress theme’s style sheet, we don’t recommend this method because it’s easy to make mistakes and any changes you make will get overwritten when you update your theme (unless you use a child theme).
Fortunately, there’s an easier solution. To add CSS to WordPress, follow these steps:
- Log-in to the WPAdmin section of your site.
- Navigate to Appearance > Customize in your WordPress dashboard to open the WordPress Customizer
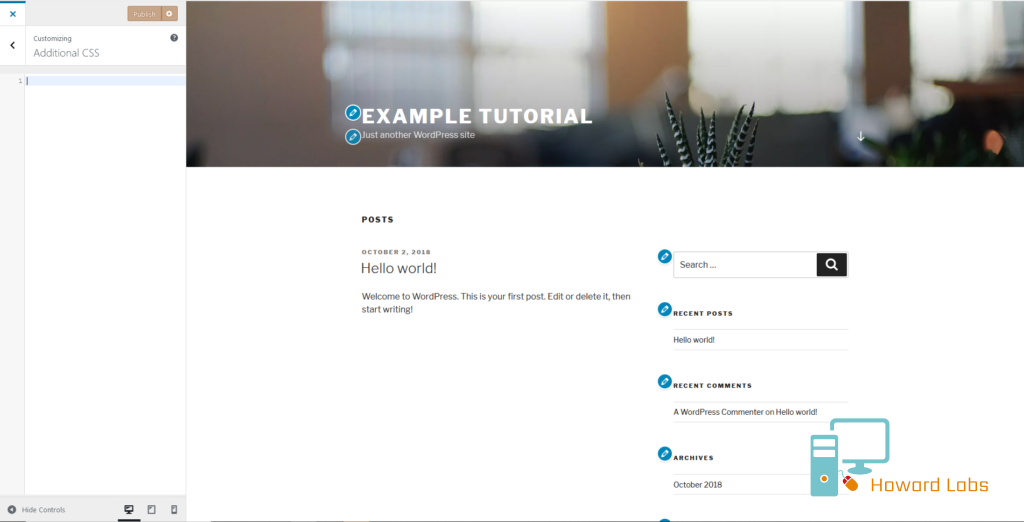
- Select the Additional CSS option from the menu on the left in the WordPress Customizer interface:
The built-in WordPress editor enables you to type in lines of CSS code, without having to adjust existing style sheets. There is no limit to the number of CSS rules you can enter here – just include each new snippet on its own line. Additionally, you can see each change take effect in the live preview. This way, you know exactly how they will look before publishing them on your site.
The editor also comes with a validator built-in, this will alert you to any notable mistakes in your code. Let’s explore a few simple ways we can start customizing your site’s appearance with CSS.
How to start customizing your WordPress site with CSS
You can change almost every aspect of your site’s appearance using CSS in WordPress. From minor alterations to changes which affect your entire site in just a few lines of code. For now, however, let’s keep things simple and look at some basic CSS tweaks you can make.
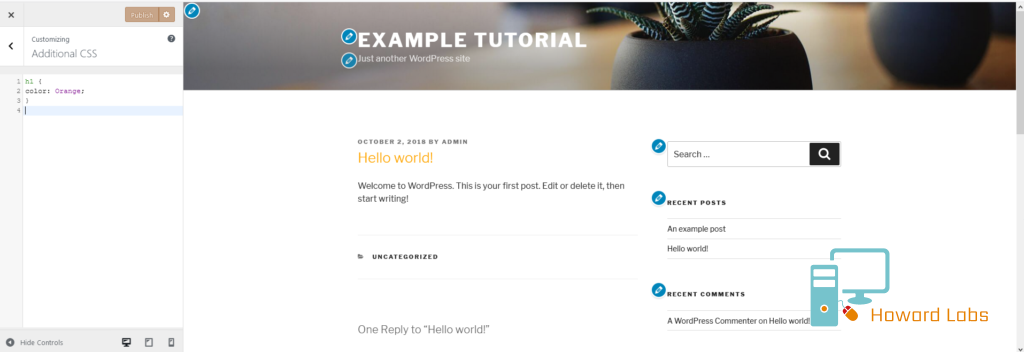
We already mentioned altering the colour of our content, so let’s start there. If you really want your WordPress posts to grab your visitors’ attention, you can experiment with changing the colours for each post. This is what a basic post looks like in the Twenty Seventeen WordPress theme:
Taking a closer look at your content
Let’s try changing the colour of our post titles. Firstly, before we can start tweaking our styles, we need to find out the type of elements we need to change. Right-click on an element of your page and after that, select “Inspect Element” to open the “Developer Tools” of your browser.
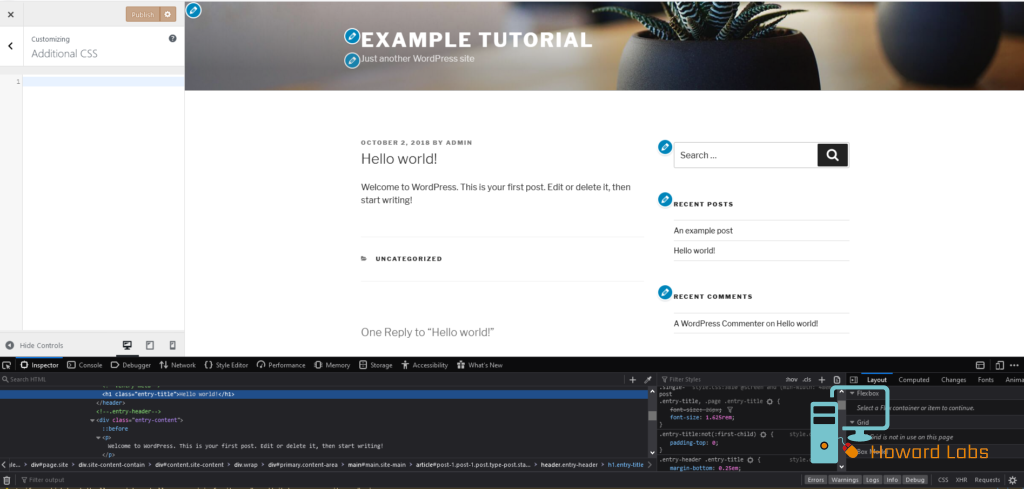
(Your developer tools may look slightly different to the example shown, this is how it looks in Mozilla Firefox at the time of writing.)
As you can see from the above example, the post-title within this WordPress theme uses an “H1” header with an “entry-title” class. Each unique class can have its own attributes and style allowing for finer control over the layout of your content.
Making style changes via CSS
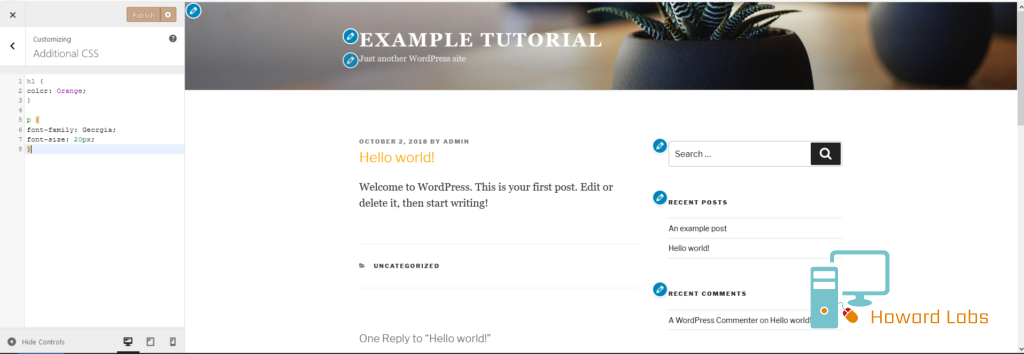
Let’s change the colour of this with some basic CSS code, in the “Additional CSS” editor, enter the following:
/* Changing the post title colour */
h1 {
color: Orange;
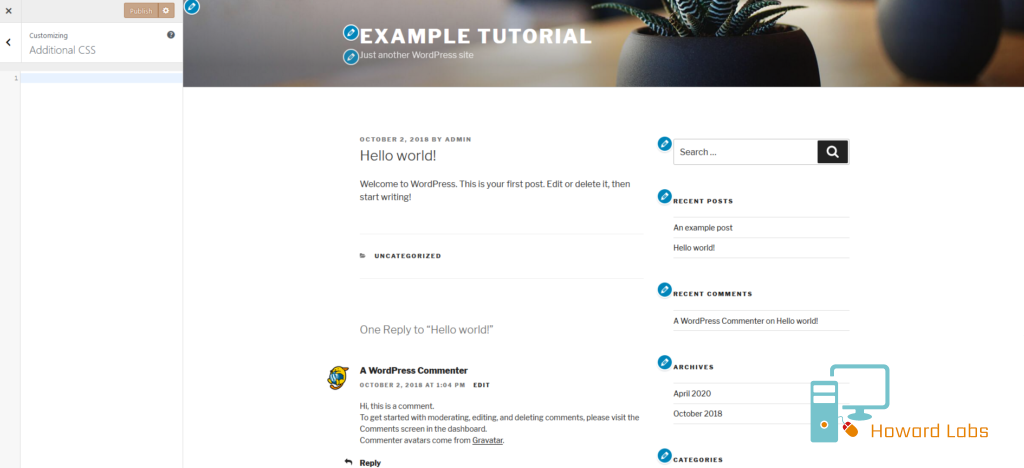
}This tells the browser to change all “H1” headers to orange, therefore the post title’s color has changed from black to orange:
This change will be applied to every post on your site. Instead of simply naming a colour, you can also use hex codes to get the shade just right. Simply replace orange with #FFA500 (or whatever colour you want to use). When you’re happy with the changes that have been made, select Publish at the top of the screen to make your changes live.
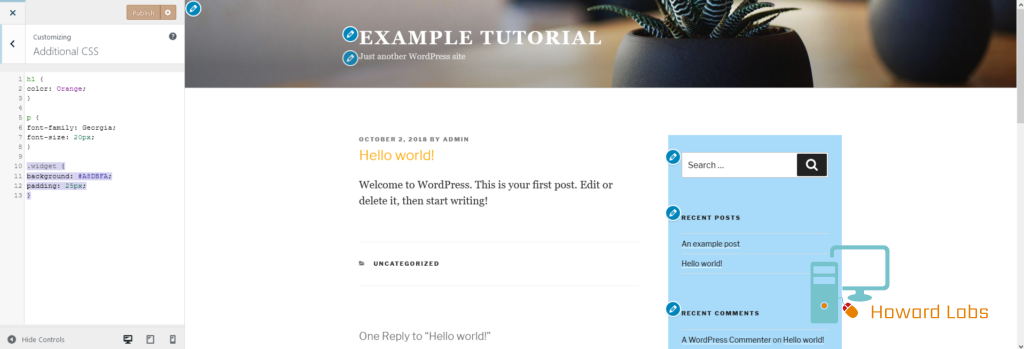
How about making some alterations to the body text? Let’s take a look at editting its font family and size, by adding this code on a new line:
/* Changing the post body text */
p {
font-family: Georgia;
font-size: 20px;
}
The code above tells the browser to format all paragraphs with the settings we specify. As a result you can see the changes right away in the Customizer preview:
Finally, let’s give the sidebar widgets a little more colour and padding. On a new line, paste in this CSS:
.widget {
background: #A8DBFA;
padding: 25px;
}
As you can see, this places a simple background behind your widgets:
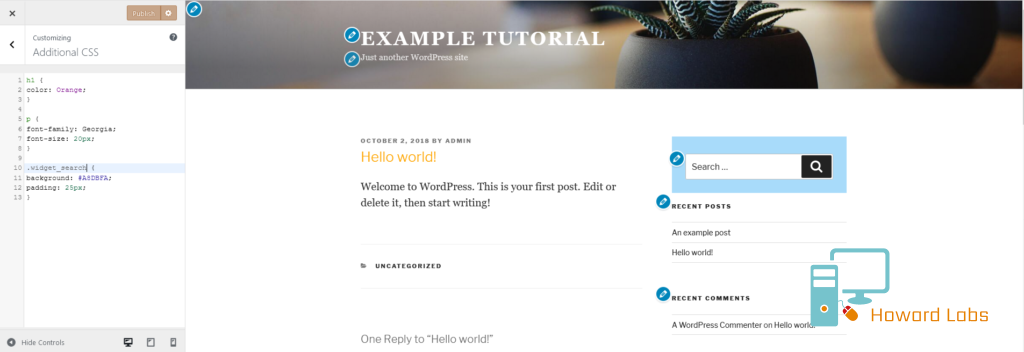
It is worth noting that this code will affect all of your widget areas on your theme, including the footer. But what if you only want it to affect a single widget, this is where classes come in. For example, you could add a style specific to the search widget, by replacing .widget in the code example given with .widget_search:
Let’s break it down
At this point, you should hopefully start to build an understanding of how CSS works under the hood. The first line of a CSS snippet specifies which element you’re altering – such as post titles (h1), the text contained in paragraphs (p), or a particular class (widget_search). The following lines, enclosed in brackets, contain specific instructions about what should be changed and the specific styles you wish to apply.
CSS is also cascading/hierarchical in nature, that is to say, certain rules override other rules based on their priority/specificity. For further information on how this works and how to overcome any issues you might face, check out the additional resources at the end of this post.
What does HTML mean?
HTML stands for “Hyper Text Markup Language“, this is the code which defines the content of your page. A basic understanding of HTML will further assist in your understanding of CSS and how they can be used together.
What does HTML do?
HTML is the underlying code behind your content, having a basic understanding of HTML is ideal for those aiming to create websites or blogs of their own. To clarify, HTML code tells web browsers about the various elements of your content. For example, it indicates which text is part of a header, and which is part of a body paragraph.
WordPress has modules to help create the core of your pages for you, these are highly customizable and require minimal knowledge of HTML leaving you more time to focus on the look and feel of your content.
Each element of your page is made up of HTML, for example, headers, paragraphs, tables and images are all defined by HTML.
Key Takeaways
- CSS gives you complete control over the style of your content.
- HTML is the underlying foundation of your content.
- CSS gives you great flexibility at minimal cost to performance.
- WordPress CSS can be applied without altering core files.
- CSS is cascading and works based on specificity and source
- CSS follows a specific structure of the type of element followed by styling rules.
Working with code can seem intimidating if you’re a beginner, a foreign language almost. However, many of the languages your site relies on are surprisingly user-friendly when it comes to making basic adjustments. Learning to use CSS in WordPress effectively may take a little time, but it will provide you with an unprecedented level of control over your site’s look and layout.
We recommend making changes within the WordPress Customizer when adding or altering CSS code, this allows for quick and safe edits. This process enables you to tweak every aspect of your content without having to delve into your active theme’s code. Additionally, you’ll get to see the effects of your changes in real time with the preview, so you know exactly what effect they’ll have before you publish.
Resources
We hope this has helped you on your journey to creating a blog/site with your own unique look/feel. If you’d like to learn more about CSS and how it works, check out some of the resources listed below. With a little practice, you’ll find yourself adding and understanding CSS with ease in no time.
“CSS – Zero to Hero” – Youtube – https://www.youtube.com/watch?v=1Rs2ND1ryYc
“W3Schools – CSS Guide” – https://www.w3schools.com/css/
“CSS Cascading and Inheritance” – https://developer.mozilla.org/en-US/docs/Learn/CSS/Building_blocks/Cascade_and_inheritance
“RGC Colour Code Generator” – https://rgbcolorcode.com/
“CSS Element Cheatsheet” – https://www.codeinwp.com/blog/wordpress-cheat-sheets-web-development-design/#CSS
“Jargon Buster” – https://howardlabs.co.uk/Jargon-Busting
Do you have any questions about how to use CSS in WordPress? Ask us anything in the comments section below!
I need to sit down and read this very carefully. I actually wondered how you achieved this on your website but didn’t ask, and here you’ve answered my question. Thanks Daryl!
If you have any questions, feel free to get in touch.
Daryl you are very talented and I am excited to travel this journey of behind the IT scenes . I love how you explain tech making it sound easy. Keep up up the the good work. Great content thanks.